One of the most vital features a developer implements in an application on a server is authentication . Authentication has a great impact on future features of your application. For instance, you can’t implement role based access control without it. You also can’t add payments in your app without it. In fact, in most scenarios, it’s literally the first step in your app’s journey!
Authentication greatly impacts your business decisions, your product, and your users. For example, to evaluate your daily or weekly active users, you extract data from users’ authenticated sessions. All in all, it’s a security feature you can never compromise on.
However, there are use cases that you might unintentionally miss when implementing authentication. Or there could be scenarios where your authentication workflow introduces vulnerabilities. In these cases, your application suffers from broken authentication.
So in this post, I’ll talk about what broken authentication is. I’ll also show you how you can prevent it in your NodeJS application.
Authentication on the Server Side
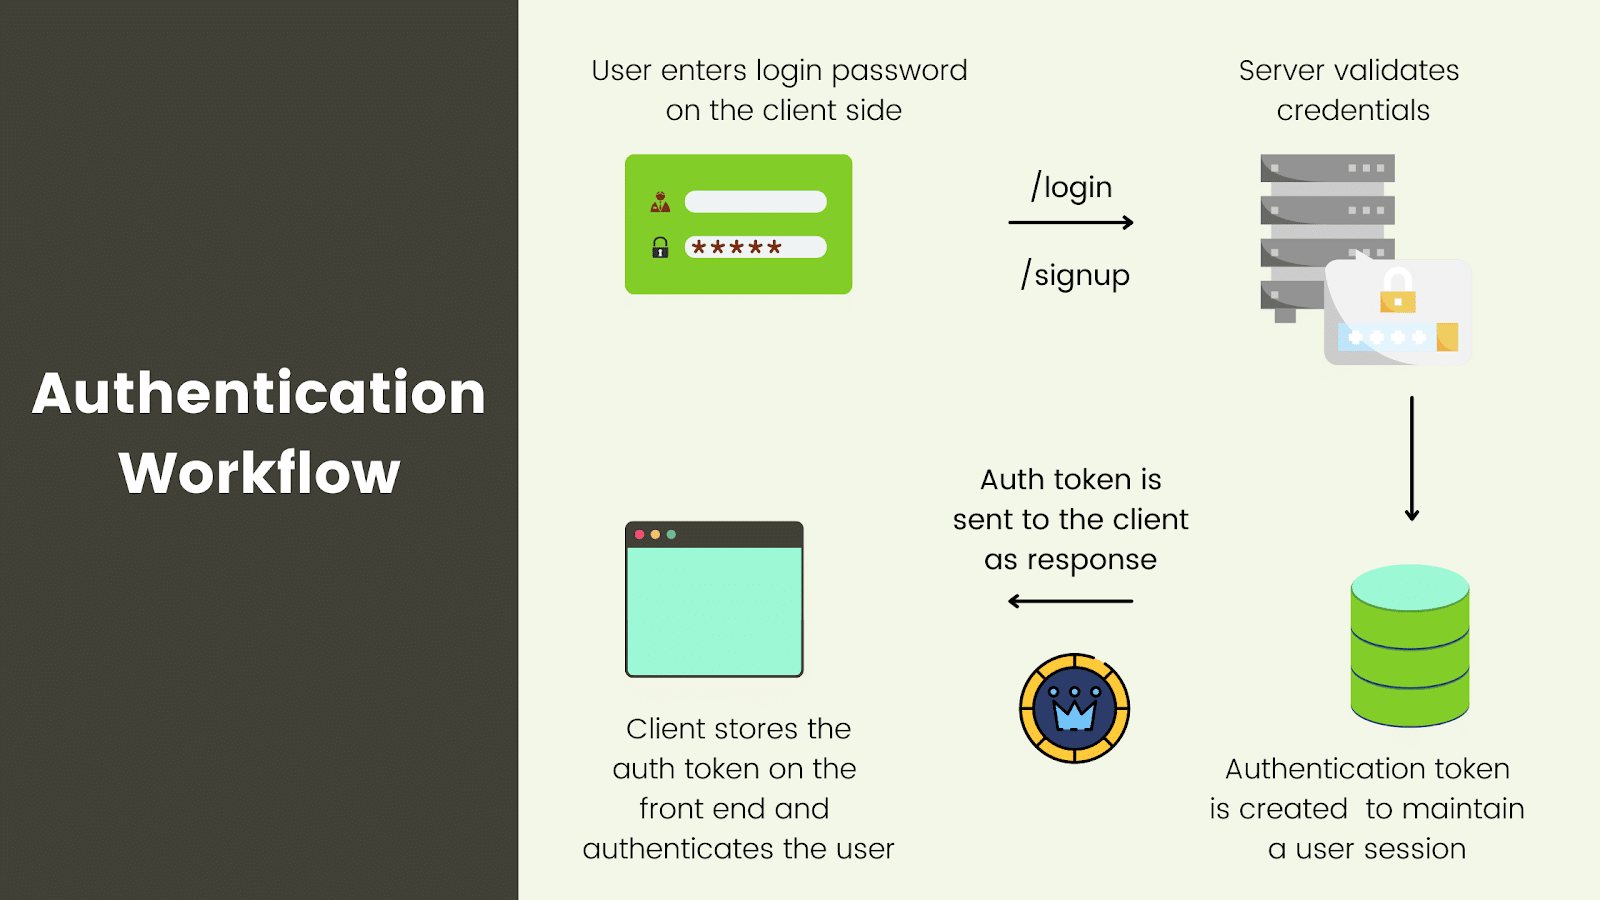
In traditional web applications, authentication has two components. First, it uses a set of backend web services for login, signup, password reset, and other secure features. Second, there’s a UI that integrates those services on the front end. Since Node.js is primarily used for building back end APIs, let’s talk about the generic implementation of authentication on the server side.

The client, or the front end, takes the user’s credentials as input. It then sends these credentials to the back end. For this purpose, it makes an HTTP request to an authentication endpoint. This could be /login or /signup, which denote login and signup API calls, respectively.
The server receives the credentials from the request and validates them. If the credentials are correct, it creates an authentication token for that session. It sends back this authentication, or auth token, to the client. The client stores this token on the front end and sends it with every subsequent request. The auth token specifies two things: it holds a signature of the authenticated user, and it represents the user in an authenticated state.
Broken Authentication Scenarios
There are a number of situations in which a loophole may arise in this workflow. Let’s discuss them briefly.
Poor Session Management
From the moment you create an auth token, it becomes the single entity that validates if a user is signed in or not. This means you need to think about the following issues:
What TTL do you set for a new auth token?
How do you handle fake authentication requests via a legitimate token?
Together, the answers to these questions determine the strength of your application’s session management. If a user’s authentication token is leaked to an attacker, that user’s account and private resources could be compromised.
The attacker could make false requests on behalf of the user and access their private resources.
There are other scenarios, such as when the user is on a public network or device. What if the user forgets to log out of their account? Or what if a vicious client-side script accesses auth token from the front end?
If your workflow doesn’t address the three issues mentioned above, your users’ accounts could be compromised. Eventually, you’d have a broken authentication vulnerability due to poor session management in your application.
Weak Credentials
What’s stopping an attacker from accessing your users’ accounts if they set passwords that can be easily guessed? Weak credentials are a major reason for broken authentication. But you might be thinking, user-set passwords are not really under your control, right?
You’re right, they aren’t. But that doesn’t mean you can’t do anything about it! Weak credentials can be exploited in many points. It could happen during account creation when a user generates a brand new password. Or it could happen during a password reset if you let users reset to older passwords.
For example, take the case where a user needs to reset their password, and they can re-use one of their older passwords. If an attacker intercepted that older password at one time in the past, and you allow the user to choose the old password, it’s easier for the same attacker to guess the password, knowing that users often recycle their passwords. This makes it easier for the attacker to break into the user’s account.
Thus, it’s important that you evaluate how you store passwords, validate their strength, and reset them in your authentication workflow. Let’s now move on and learn how we can prevent broken authentications in our Node.js application.
Use Hashing to Store Passwords
Hashing might seem obvious, but is still often skipped in authentication systems. You should never store passwords as plain text. Instead, you should hash them as secure encrypted values. Another important practice is that you should not set out to create your own hashing algorithms.
Encryption is a complex subject. It’s best left to experts, so the safest thing to do is use a trusted and popular library for hashing. For instance, you could use something like bcrypt .
const bcrypt = require('bcrypt');

//Generate Hashed Passwords when saving them to db
userSchema.pre('save', async function(next) {
  const salt = await bcrypt.genSalt();
  this.password = await bcrypt.hash(this.password, salt);
  next();
});

//Validate passwords using bcrypt on login
userSchema.statics.login = async function(email, password) {
  const user = await this.findOne({ email });
  if (user) {
    const auth = await bcrypt.compare(password, user.password);
    if (auth) {
      return user;
    }
    throw Error('incorrect password');
  }
  throw Error('incorrect email');
};
In the above code, we use a Mongoose model in which we hash the password using bcrypt. We then save this hashed password in our database. For login, we let bcrypt decrypt the hashed password and compare it to the stored credentials to validate the user’s login details.
In the entire process, neither the server, the database developer, or bcrypt knows the user’s password. This standard process is the first step of implementing authentication the right way to prevent broken authentication!
Session Management in NodeJS
Session management plays a vital role in shaping your authentication workflow. So now we’ll look at how we can strengthen session management by implementing some small changes in our authentication APIs.
Here’s the controller of a login REST API in Node.js:
module.exports.LOGIN = async (req, res) => {
  const { email, password } = req.body;

  try {
    const user = await User.login(email, password);
    const token = uuidv4();
    res.cookie('auth_token', token);
    res.status(200).json({ user: user._id });
  }
  catch (err) {
    const errors = handleErrors(err);
    res.status(400).json({ errors });
  }

}
In the above API controller, we validate credentials using Mongoose and MongoDB. If the credentials are valid, we get the user details back from our MongoDB. Then, inside the response, we send a UUID as an auth token.
Use Safe and Secure JWT With TTL
JWT stands for JSON Web Token. It’s a JSON object that has some encoded information inside it, such as a signature. It’s a standard way to create safe and secure authentication tokens. So in the controller above, let’s create a function that generates a strong and secure JWT.
You can use the jsonwebtoken library in Node.js to generate a JWT. We’ll use the logged in user’s id as a signature and also set a TTL for our JWT.
const jwt = require('jsonwebtoken');
...

const maxAge = 3 * 24 * 60 * 60;
const createToken = (id) => {
  return jwt.sign({ id }, 'secret salt', {
    expiresIn: maxAge
  });
};
In the second parameter in the jwt.sign method, we added a secret salt keyword. For the purpose of demonstration, I’ve taken something simple. However, you must and should use something more complex.
The TTL for our authentication token is three days, but you can adjust it to match the needs of your application. For example, you can use fewer days. You can also make it dynamic by setting it to depend on when the user logs in, where the user logs in from, and so on.
So now our login controller becomes:
module.exports.LOGIN = async (req, res) => {
  const { email, password } = req.body;

  try {
    const user = await User.login(email, password);
    const token = createToken(user._id);
    res.cookie('jwt', token);
    res.status(200).json({ user: user._id });
  }
  catch (err) {
    const errors = handleErrors(err);
    res.status(400).json({ errors });
  }

}
Great! You’ve just made your authentication workflow more secure and reduced the chances of encountering a broken authentication vulnerability. Let’s move forward.
Use an HttpOnly Cookie With TTL

We send the JWT or auth token as a cookie. This cookie sets itself to the client’s browser. However, there is nothing special about this cookie. Any client-side JavaScript can actually access, modify, or delete the cookie. Also, by giving our client access to the cookie, the client is held partly responsible for handling and managing the user’s session.
We know that client-side code is easily accessible via the browser. That means client-side validations can be easily bypassed on the front end. The best practice is to let the server handle session management end to end. We can make this auth token a special server-side cookie. This is called an HttpOnly cookie. Only the server that sets this cookie can access it.
Moreover, the HttpOnly cookie is automatically sent with every request from the browser. Therefore, the server remains completely in charge of the entire authentication workflow.
Even if someone attacks the client-side code, client-side JavaScript cannot access or modify the cookie via JavaScript.
res.cookie('jwt', token, { httpOnly: true, maxAge: maxAge * 1000 });
We also set a TTL on the cookie. Remember, the auth token’s TTL represents session duration, and now the cookie’s TTL represents that auth token’s lifetime. You need to ensure you implement both for a foolproof authentication workflow.
Validate Credential Strength on the Server

We can validate the strength of a user’s password on the server side using a library called owasp-password-strength-tester , which validates the password’s strength based on some common guidelines .
You can install it by running the following command:
npminstallowasp-password-strength-test
Then, import it as shown below:
const owasp = require('owasp-password-strength-test');
Next, we can modify our signup controller accordingly:
module.exports.SIGNUP = async (req, res) => {
  const { email, password } = req.body;

  try {
    const result = owasp.test(password);
    if(!result.strong){
      res.status(401).json({error:result.errors})
    }
   ...
  }
  catch(err) {
   ...
  }

}
Now, if the user has a weak password, your SignUp API sends an error. Inside this error, it says what the password is missing to make it secure. The client can use this information to make the user choose a stronger password.

Conclusion
To sum up, here’s what your server needs to prevent broken authentication:
Hashing to store passwords in the database
Secure JWT as auth tokens with valid TTL
JWT as an HttpOnly cookie, if possible
Password strength validation
If you wish to explore some client-side perspectives on broken authentication, check out my posts on this subject for React and Angular .
This post was written by Siddhant Varma. Siddhant is a full stack JavaScript developer with expertise in frontend engineering. He’s worked with scaling multiple startups in India and has experience building products in the Ed-Tech and healthcare industries. Siddhant has a passion for teaching and a knack for writing. He’s also taught programming to many graduates, helping them become better future developers.


