
Web applications often depend on resources from an external source or domain. For example, a website can display an image hosted on another site. Beyond images, a web application may fetch JSON format data from an external API.
However, sharing resources across websites isn’t always a smooth ride. If you’ve made HTTP requests from JavaScript to another site, you’ve probably seen a CORS error. The full meaning of CORS is Cross-Origin Resource Sharing.
A public API may accept requests from any origin. However, the default behavior of most web servers does not permit such requests. You might find yourself running into CORS-related errors when you try to access data from a remote API while testing a Vue app locally. This can also occur when working with Vue and another local back-end server that makes use of a different port.
CORS-related errors can be annoying. They can take minutes or hours to debug. In this post, we’ll cover CORS in Vue. We’ll also discuss how to enable CORS requests with Vue. In addition, we’ll show you how to debug and fix CORS errors.
We’ll start by taking a look at what CORS is.
What Is CORS?
CORS is a mechanism that can be found in modern web browsers like Chrome, Firefox, Safari, and Edge. It prevents Domain A from accessing resources on Domain B without explicit permission.
According to the MDN Docs , “Cross-Origin Resource Sharing (CORS) is an HTTP-header based mechanism that allows a server to indicate any other origins (domain, scheme, or port) than its own from which a browser should permit loading of resources.”
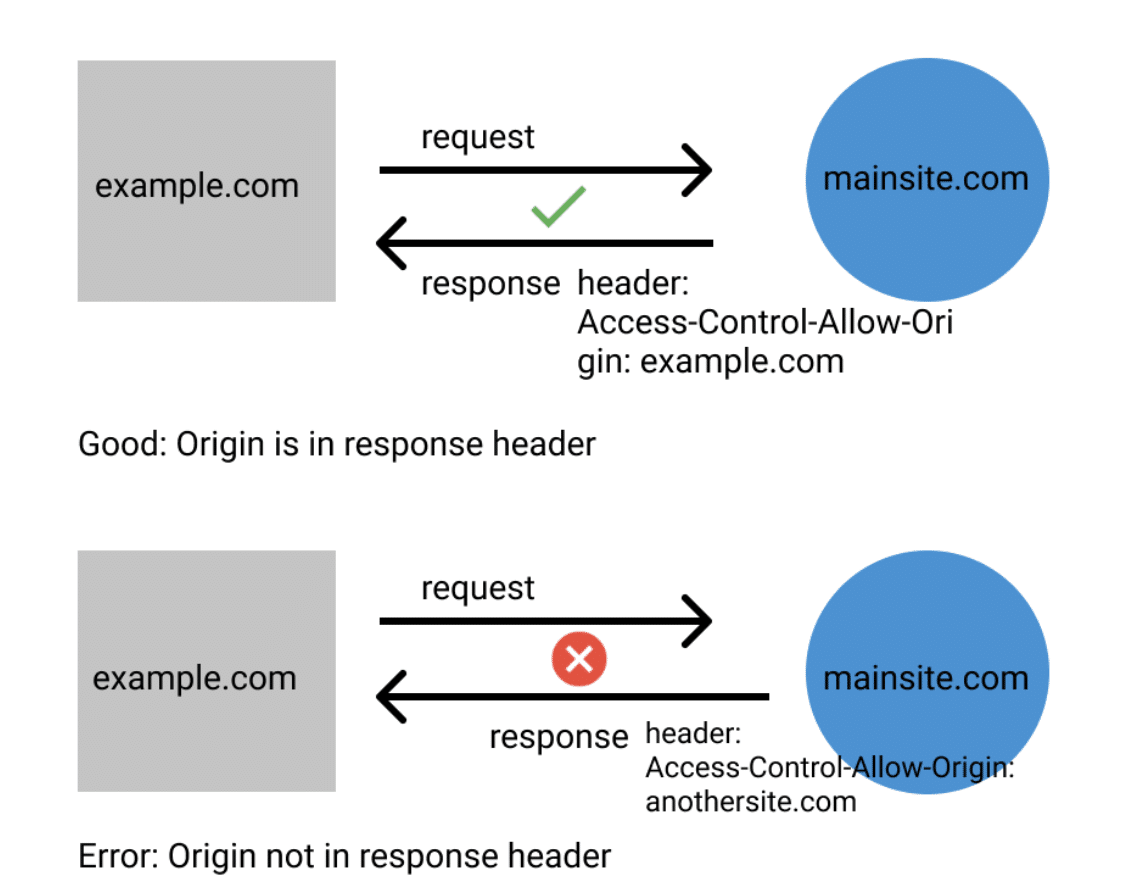
The permission for which external domains may access resources on Domain B must be defined on Domain B. The permission is set using the Access-Control-Allow-Origin header. For example, if Domain A is example.com and Domain B is mainsite.com , the correct header will be the following:
Access-Control-Allow-Origin: example.com
Alternatively, a wildcard can be set in the header using*
. However, this is not always a good security practice. To learn more about CORS, check out our  pillar post.
HTTP Headers
HTTP headers are channels through which the browser and server pass additional information. There are two cases in which headers are used. In the first, the client browser sends additional information to the server while making a request. In the second case, a server sends additional information to the client along with the response.
The browser may use headers to authenticate with a server. The server, on the other hand, can respond with a header telling the browser which resources it can access. CORS response is sent back to the browser using a header.
The following is an example of a header response for an HTTP request:
accept-ranges: "bytes"
content-length: "785"
content-type: "text/html; charset=UTF-8"
date: "Sun, 01 Aug 2021 02:00:35 GMT"
etag: "W/"311-4gBYPqEJbr0hYJMBrIkiiBUknS4"
Each header is made up of a key and a value. The name of the key is case insensitive.
A front-end developer may set additional headers before sending an HTTP request. Similarly, additional headers can be set from the back end and returned with a response.
How to Enable CORS in Vue
CORS is a browser feature. However, there are a few ways to work around it. For example, unlike browsers, CURL and Postman can bypass CORS. Therefore, a remote API that throws a CORS error in Vue may work as expected while using either CURL or Postman.
One way to enable cross-origin requests in Vue without a CORS error is by using the built-in proxy feature. However, this is only a temporary fix and may cause security issues.
To enable this method of bypassing CORS in Vue, we’ll need to set some configurations in the vue.config.js file.
Steps
1. First, create a vue.config.js file if it doesn’t already exist in the root of your Vue project.
2. Then paste the following code in the new file:
module.exports = {
}
3. Next, configure a proxy. For example, if we plan to access a resource on mainsite.com/api, the value for our proxy will be mainsite.com. Here is the full code for the proxy configuration:
module.exports = {
   devServer: {
      proxy: 'https://mainsite.com/',
   }
}
4. Finally, make requests to the API using relative paths.
With this method, we should be able to access content initially blocked by CORS.
How to Detect and Debug CORS Errors
Most modern web browsers have a developer tool built in. The developer tool has a console that can log JavaScript errors. To access this console, right-click anywhere on the browser page, then select Inspect . After that, click the Console tab. Then you can observe the console output for any CORS-related error messages.
The screenshot below shows a CORS error message in the developer console.

This is the error message:
“Access to XMLHttpRequest at http://127.0.0.1:8000/ from origin http://localhost:8080 has been blocked by CORS policy: No ‘Access-Control-Allow-Origin’ header is present on the requested resource.” It’s a CORS error, obviously. From the error message, we can observe two things. First, the Vue app (the request origin) uses localhost and port 8080. Second, the remote API uses a different port, 8000. The browser treats both addresses as different domains because they have different ports.
In the next section, we’ll talk about ways to prevent and fix CORS errors.
How to Fix CORS Errors
The back end sets CORS headers. Hence, a front-end developer has limited options to fix or prevent CORS errors.
Googling “how to fix CORS errors” may bring up results with suggestions that can harm your site.
If you are getting a CORS-related error on an API developed by your team, contacting the back-end developers on your team should be your first move. They’ll usually need to add the domain you’re trying to access the API from to the Access-Control-Allow-Origin header.
However, if the API is from a third party, you may need to contact the developers from their website or through other channels. This process can be slow, depending on the developer.
A proxy acts as an intermediary between a client and server. Using a proxy can fix some CORS errors. You can set a proxy in Vue using the vue.config.js file . The file is located on the root directory of a Vue project. If it’s not present, you can create one.
Not every fix for a CORS error is a good fix. For example, setting the value for the Access-Control-Allow-Origin header to "*
" on the back end may clear many CORS errors. However, this may have a negative impact on the security of the API.Setting the value for Access-Control-Allow-Origin to the*
wildcard means any domain can access the API. In other words, anyone on the Internet can access the API. CORS exists for security reasons, and a fix that completely or partially turns it off may expose your application to attacks. See  this  answer on StackOverflow for more details on why the "*
" wildcard might be a bad fix.
Conclusion
We’ve covered what CORS is and how it’s a mechanism in browsers. As a result, CURL and Postman may not encounter CORS errors.
We also looked at how to enable CORS in Vue. We were able to fix a CORS error for a debug server using Vue proxy.
Finally, it’s worth mentioning that before you fix any CORS errors, be sure to research the security implications associated with it.
This post was written by Pius Aboyi. Pius is a mobile and web developer with over 4 years of experience building for the Android platform. He writes code in Java, Kotlin, and PHP. He loves writing about tech and creating how-to tutorials for developers.


